Kubernetes
Kubernetes, often abbreviated as K8s, is an open-source project that originated at Google. Version one of Kubernetes was released in July 2015. It was the third generation of container schedulers from Google, following previous projects like Borg and Omega. Google later donated Kubernetes to the Cloud Native Computing Foundation (CNCF), which now supervises its development.
Its primary purpose is to serve as the leading container orchestration tool. It is designed as a loosely coupled collection of components for deploying, managing, and scaling containers. Kubernetes is vendor-neutral, meaning it is not tied to a single company and can run on all cloud providers. There is also a significant community ecosystem surrounding it.
Kubernetes facilitates a range of functionalities, including:
- Service Discovery
- Load balancing
- Bridging to cloud providers’ storage services
- Providing rollout and rollback capabilities
- Monitoring the health of containers
- Managing configuration and secrets
- Offering a consistent API across both on-premise solutions and various cloud providers
However, Kubernetes does not deploy or build your code, nor does it provide application-level services such as databases, service buses, or caches. It is an essential component of a cloud-native application architecture, often used alongside microservices. When adopting a cloud-native approach, it is recommended to use an orchestrator like Kubernetes and automate deployment through continuous integration and continuous delivery (CI/CD) techniques and tools.
Installing
Installing Docker is straightforward, but the process is different for each operating system. You should always check the official Docker website for the latest version and the most up-to-date instructions.
🖥️ Windows
The recommended way to install Docker on Windows is with Docker Desktop, which is a one-click installer for your PC. It bundles the Docker Engine, Docker CLI, Docker Compose, and Kubernetes into a single, easy-to-use application.
System Requirements:
- Windows 10 64-bit: Pro, Enterprise, or Education version 21H2 (build 19044) or higher.
- Windows 11 64-bit: Home or Pro version 21H2 or higher, or Enterprise or Education version 21H2 or higher.
- 4GB of RAM.
- Hardware virtualization support enabled in BIOS.
- WSL 2 backend: Required for most modern Windows installations.
- Hyper-V backend: An alternative for systems that can’t use WSL 2.
Installation Steps:
- Download the Docker Desktop installer from the official Docker website.
- Double-click the
.exefile to run the installer. - Follow the installation wizard’s instructions.
- After installation, the application will automatically start. You may be prompted to accept the Docker Subscription Service Agreement.
- Verify the installation by opening a terminal (like PowerShell or Command Prompt) and running
docker --version.
🍏 Mac
Just like on Windows, the easiest way to get Docker on a Mac is by using Docker Desktop for Mac. It also includes the Docker Engine, CLI, and other tools, and runs a lightweight Linux VM to host the containers.
System Requirements:
- macOS 10.15 Catalina or newer.
- 4GB of RAM.
- For Apple Silicon (M1, M2) chips, Rosetta 2 is recommended for some optional command-line tools.
Installation Steps:
- Download the Docker Desktop installer (
.dmgfile) for your specific Mac chip (Apple Silicon or Intel) from the official Docker website. - Open the
.dmgfile and drag the Docker icon into your Applications folder. - Navigate to your Applications folder and launch Docker Desktop.
- The first time you run it, you’ll have to accept the subscription agreement and enter your Mac’s password to configure networking components.
- Verify the installation by opening a terminal and running
docker --version.
- Download the Docker Desktop installer (
🐧 Linux
On Linux, you can either install Docker Desktop or install the Docker Engine directly from the package repositories. Installing the engine is the more common approach.
Docker Desktop for Linux
Docker Desktop is now available for some Linux distributions, including Ubuntu and Fedora. This is a good option if you want a graphical interface to manage your containers.
- Installation Steps (for Ubuntu):
- Update your system’s packages:
sudo apt update. - Download the
.debpackage from the Docker website. - Install the package:
sudo apt-get install ./docker-desktop-<arch>.deb(replace<arch>with your system architecture). - Launch Docker Desktop from your applications menu.
- Update your system’s packages:
Docker Engine (using package manager)
This is the standard and most flexible way to install Docker on Linux. The steps vary slightly depending on your distribution (e.g., Ubuntu, CentOS, Fedora).
- Ubuntu/Debian:
- Update your package list:
sudo apt-get update. - Install necessary dependencies:
sudo apt-get install ca-certificates curl gnupg. - Add Docker’s official GPG key and repository:
1
2
3
4
sudo install -m 0755 -d /etc/apt/keyrings curl -fsSL https://download.docker.com/linux/ubuntu/gpg | sudo gpg --dearmor -o /etc/apt/keyrings/docker.gpg sudo chmod a+r /etc/apt/keyrings/docker.gpg echo "deb [arch=$(dpkg --print-architecture) signed-by=/etc/apt/keyrings/docker.gpg] https://download.docker.com/linux/ubuntu $(. /etc/os-release && echo "$VERSION_CODENAME") stable" | sudo tee /etc/apt/sources.list.d/docker.list > /dev/null - Install Docker Engine:
sudo apt-get install docker-ce docker-ce-cli containerd.io docker-buildx-plugin docker-compose-plugin. - Add your user to the
dockergroup to run commands withoutsudo:sudo usermod -aG docker $USER. You must log out and back in for this to take effect. - Verify the installation by running a test container:
docker run hello-world.
- Update your package list:
Kubernetes architecture
Kubernetes works on the following architecture

Kubernetes, often abbreviated as K8s, has a well-defined architecture composed primarily of a master node (also called the control plane) and one or more worker nodes. All nodes collectively form a cluster.
Here’s a breakdown of the Kubernetes structure:
Master Node (Control Plane)
The master node, or control plane, runs the core Kubernetes services and controllers. These are also known as the master components. Typically, your application containers do not run on the master node.
The main components of the master node include:
- API Server: This is the only component that clients (like the Kubernetes CLI or web dashboards) interact with, exposing a REST API. It saves the cluster’s state in etCD.
- etCD: A key-value data store that serves as the single source of truth for the cluster’s state. The API server is the only component that communicates directly with etCD.
- Kube Control Manager: This is the “controller of controllers” and is responsible for running other Kubernetes controllers.
- Cloud Control Manager: This component interacts with cloud providers to manage resources like checking if nodes were created or deleted, routing traffic, creating or deleting load balancers, and interacting with cloud storage services.
- Kube Scheduler: This watches for newly created pods that haven’t been assigned to a node and selects an appropriate worker node for them to run on, considering various rules and resource availability.
- Add-ons: Additional functionalities can be installed on the master node through add-ons to extend the cluster’s capabilities.
Worker Nodes
The worker nodes are the machines where your application containers (encapsulated within pods) actually run. When a worker node is added to a cluster, certain Kubernetes services are automatically installed.
Key components found on each worker node are:
- Container Runtime: Kubernetes supports various container runtimes that implement the Kubernetes Container Runtime Interface (CRI) specification. For versions prior to 1.19, Moby (the container runtime used by Docker) was common, but starting with 1.19, it’s no longer installed by default, though Docker images still run as usual.
- Kubelet: This agent manages the pod’s lifecycle on the node, ensuring that the containers specified in the pod definition are running and healthy.
- Kube Proxy: A network proxy that manages network rules on the nodes, directing all network traffic.
Node Pools and Local Setup
A node pool is a group of virtual machines of the same size, and a cluster can have multiple node pools. For local development and testing, tools like Docker Desktop, Minikube, Kind, and MicroK8s allow you to run Kubernetes on your desktop or laptop.
It’s important to note that Docker Desktop is limited to a single node, meaning it runs the master components and all application containers on the same node. In contrast, Minikube, Kind, and MicroK8s can emulate multiple worker nodes. Regardless of the local solution, virtualization must be enabled on your machine.
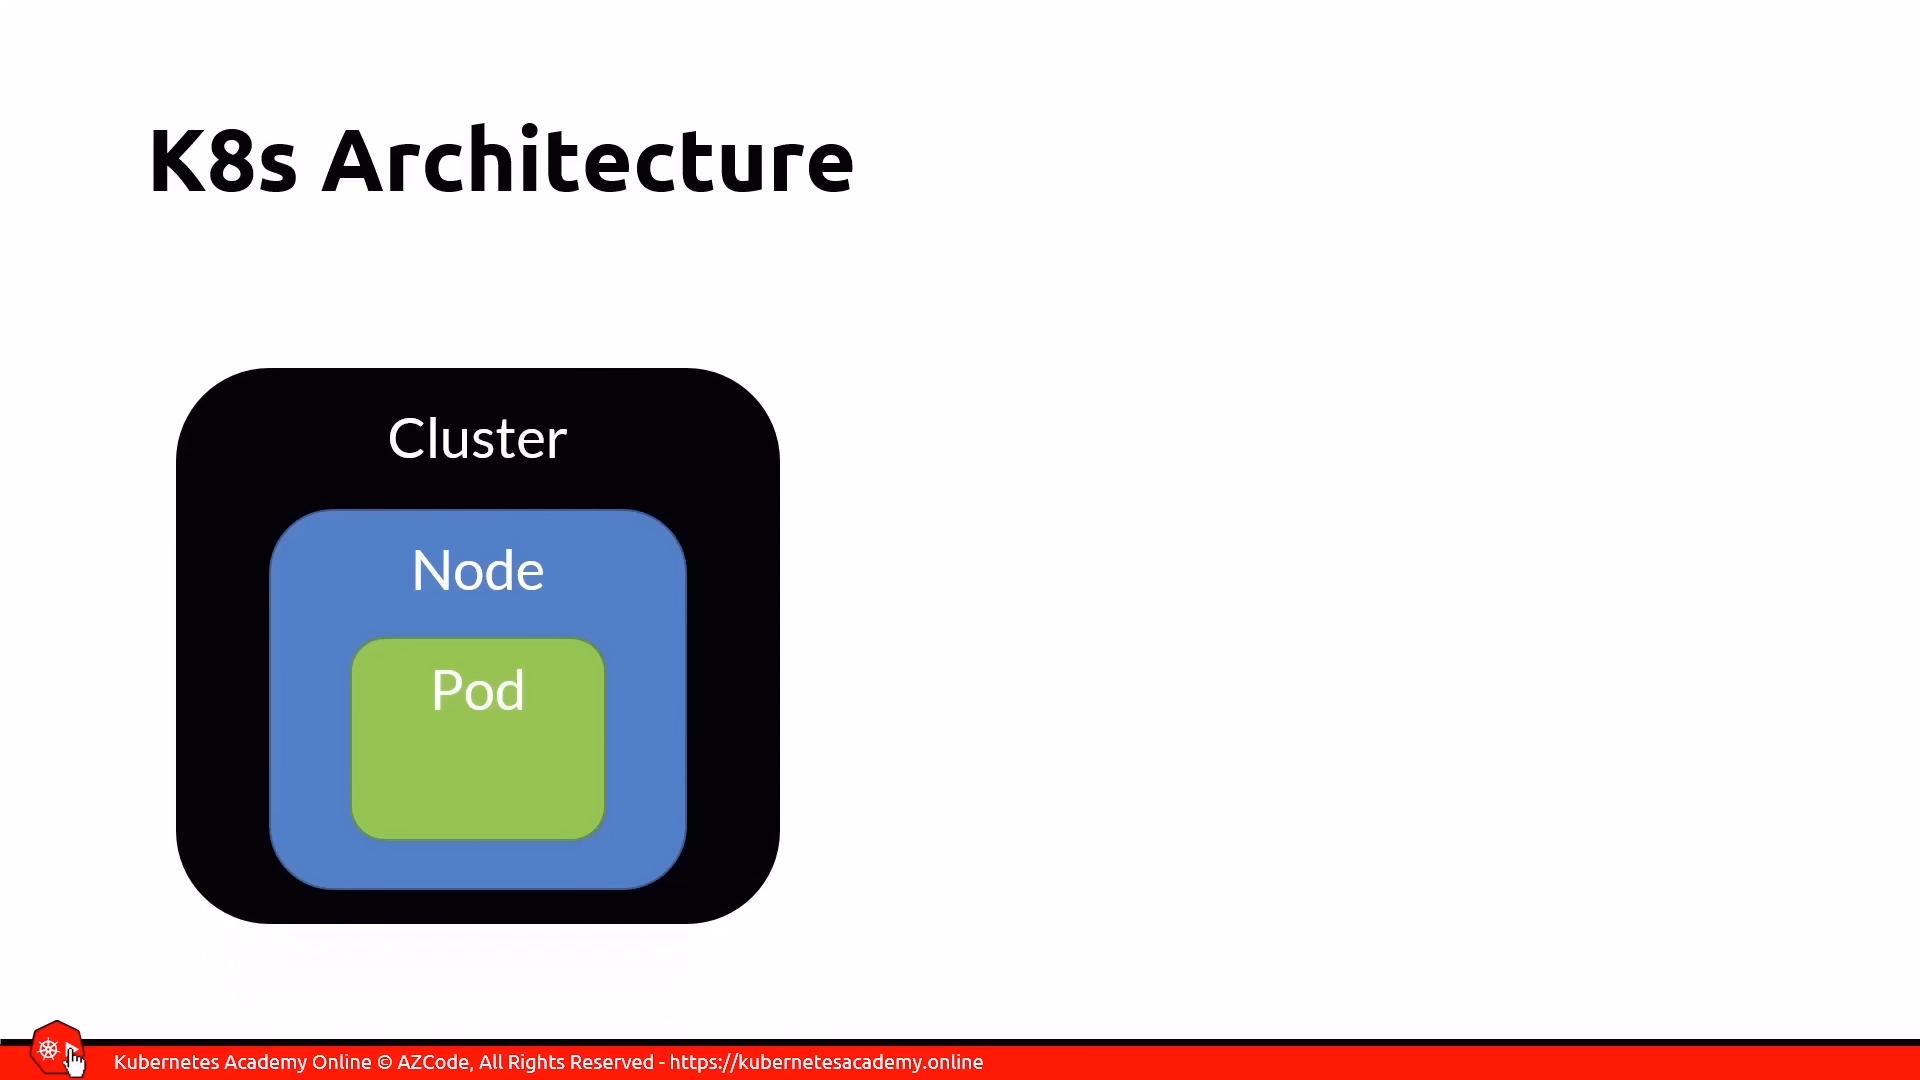
Communication and Pods
- A container will run in a pod.
- A pod runs in a node.
- All nodes form a cluster.
Pods are the smallest unit of work, encapsulating one or more application containers. Containers within the same pod share the same IP address space and volumes, communicating via localhost. All pods within a cluster can communicate with each other, and all nodes can communicate with all pods. However, pods are assigned ephemeral IP addresses, which is why Kubernetes introduces Services to provide stable, persistent IP addresses and DNS names for accessing pods.
Context in Kubernetes
In Kubernetes, a context is a crucial concept that allows you to manage connections to different Kubernetes clusters.
Here’s a breakdown of what a context is and the commands associated with it:
What is a Kubernetes Context?
A context is a group of access parameters that enable you to connect to a Kubernetes cluster. It contains the necessary connection information to interact with a specific cluster. This is particularly useful when you need to connect to multiple clusters, such as development, testing, and production environments, or different cloud-based clusters (like one on Azure and another on Docker Desktop).
Each context typically includes:
- The cluster name.
- A user associated with that cluster.
- A namespace within that cluster.
The current context refers to the cluster against which all subsequent kubectl commands will be executed. For example, if you have contexts for Cluster A, Cluster B, and Cluster C, and you set Cluster B as your current context, then all kubectl commands you run will apply to Cluster B.
Where Context Information is Stored
The connection information for your contexts is stored locally on your machine in a YAML configuration file. On Windows, this file is typically found in C:\Users\YourUsername\.kube\config. This YAML file contains entries for different clusters and the contexts configured to access them.
Commands for Managing Contexts
The kubectl config command is used to manage contexts. Here are some key commands:
kubectl config current-context- Purpose: Displays the name of the context you are currently using.
- Example: If you’re currently in the Docker Desktop context, this command will print “docker-desktop”.
kubectl config get-contexts- Purpose: Lists all the contexts that are configured on your machine.
- Output: Shows all available contexts, with the current context usually marked with a star in the
CURRENTcolumn.
kubectl config use-context <CONTEXT_NAME>- Purpose: Switches your current context to the specified context. All subsequent
kubectlcommands will then target this newly selected cluster. - Example:
kubectl config use-context demowould switch to a context nameddemo.
- Purpose: Switches your current context to the specified context. All subsequent
kubectl config rename-context <OLD_NAME> <NEW_NAME>- Purpose: Renames an existing context. This is useful for making context names more descriptive or easier to remember.
- Example:
kubectl config rename-context demo azure-demowould rename thedemocontext toazure-demo.
kubectl config delete-context <CONTEXT_NAME>- Purpose: Deletes a specified context from your configuration file.
- Note: This command only removes the context entry from your local configuration; it does not delete the actual Kubernetes cluster itself. You may also need to manually edit the config file to remove associated cluster information if no other context uses it.
- Example:
kubectl config delete-context azure-demowould remove theazure-democontext.
kubectl config set-context --current --namespace=<NAMESPACE_NAME>- Purpose: Modifies the current context to use a specific namespace for future commands without changing the cluster.
- Example:
kubectl config set-context --current --namespace=kube-systemwould set the default namespace for your current context tokube-system.
Helper Tool: kubectx
A popular open-source tool called kubectx acts as a shortcut for the kubectl config use-context command.
- Purpose: It allows you to quickly list and switch between contexts with fewer keystrokes.
- Usage: Simply typing
kubectxwill list your configured contexts, andkubectx <CONTEXT_NAME>will switch to the specified context. It is available on Windows, Mac, and Linux.
Control nodes and pods
Master Node (Control Plane)
The master node, also known as the control plane, is the brain of the Kubernetes cluster. It is where the core Kubernetes services and controllers reside, managing the overall state and operations of the cluster. Typically, application containers are not run directly on the master node.
The master node comprises several critical components:
- API Server: This component exposes a REST interface that serves as the only point of communication for Kubernetes clusters. All client tools, such as the Kubernetes command-line interface (CLI)
kubectl, interact with the cluster through this REST API. It is also responsible for saving the entire state of the cluster into etcd. - etcd: This is a key-value data store that acts as the single source of truth for the cluster, storing its complete state. The API server is the exclusive component that communicates directly with etcd.
- Kube Control Manager: Often referred to as the “controller of controllers,” its primary role is to run other Kubernetes controllers, ensuring that the desired state of the cluster is maintained.
- Cloud Control Manager: This component specifically interacts with cloud providers. Its responsibilities include checking for node creation or deletion, routing traffic, creating or deleting load balancers, and integrating with the cloud provider’s storage services.
- Kube Scheduler: The scheduler continuously watches for pods that have not yet been assigned to a node. It then selects an appropriate node for these pods to run on, considering various rules and resource availability, and assigns the pod creation to that specific node.
- Add-ons: Various add-ons can be installed on the master node to provide extended functionalities to the Kubernetes cluster.
Worker Nodes (formerly Slave Nodes)
Worker nodes (historically sometimes referred to as “slave nodes” in other contexts, but Kubernetes uses “worker nodes”) are the machines (physical or virtual) that host the actual application containers you deploy within the cluster. When a worker node joins a cluster, several essential Kubernetes services are automatically installed on it:
- Container Runtime: Kubernetes supports various container runtimes that adhere to the Kubernetes Container Runtime Interface (CRI) specification. Examples include the Moby container runtime (used by Docker). This runtime is responsible for running the containers.
- Kubelet: An agent that runs on each worker node, the Kubelet manages the pod’s lifecycle. It ensures that the containers specified in the pod definitions are running and remain healthy.
- Kube-proxy: This is a network proxy that manages network rules on the nodes. All network traffic within the node, including communication between pods, is routed through the kube-proxy.
Worker nodes can be organized into node pools, which are collections of virtual machines of the same size. A cluster can include multiple node pools, each potentially offering VMs of different sizes or capabilities (e.g., some with GPUs, some without). It’s worth noting that local Kubernetes setups like Docker Desktop are typically limited to a single node, meaning the master components and all application containers run on the same machine.
Pods
A pod is the smallest deployable unit of work in Kubernetes. It encapsulates one or more application containers and represents a single unit of deployment.
Key characteristics of pods include:
- Encapsulation: A pod acts as a wrapper around one or more containers, along with shared storage resources (volumes) and a unique network IP address.
- Shared Resources: All containers within a single pod share the same IP address space and volumes. They can communicate with each other using
localhostand their assigned port numbers. - Ephemerality: Pods are designed to be ephemeral. If a pod crashes, Kubernetes replaces it with a brand new one, which will have a different IP address. This means you do not update a running pod; instead, you create an updated version, delete the old one, and deploy the new one.
- Atomic Operation: Deploying a pod is an atomic operation; it either fully succeeds or fails.
- Scaling: You scale your application by adding more pods, not by adding more containers within an existing pod.
- Multi-Container Pods: While a pod can run a single container, it can also run multiple containers. In such cases, there is usually one main “worker” container that hosts the application logic, and other “helper” containers provide supplementary services. Common design patterns for multi-container pods include:
- Sidecar Pattern: A helper container provides extra functionalities, such as copying log files to persistent storage, without cluttering the main application’s code.
- Adapter Pattern: A helper container simplifies complex monitoring data from the main worker for a monitoring service.
- Ambassador Pattern: A helper container acts as an intermediary, enabling the main application to interact with external services (e.g., a NoSQL database) without knowing the specific implementation details.
Pods go through various lifecycle states:
- Pending: The pod is scheduled for creation but not yet created. This can occur if the cluster lacks sufficient resources.
- Running: The pod is currently executing.
- Succeeded: The code within the pod exited successfully without any errors.
- Failed: The code within the pod exited with a non-zero status, indicating an error.
- Unknown: Kubernetes cannot communicate with the pod.
- CrashLoopBackOff: The pod started, crashed, was restarted by Kubernetes, and then crashed again.
Kubernetes Commands
The following table summarizes common kubectl commands related to Master Nodes, Worker Nodes, and Pods:
| Category | Command | Description |
|---|---|---|
| Cluster Info | kubectl cluster-info | Displays information about the Kubernetes master (control plane) and KubeDNS service URLs, confirming the cluster is running. |
| Nodes | kubectl get nodes | Lists all worker nodes in the cluster, showing their name, status, roles, and age. |
kubectl get nodes -o wide | Provides more detailed information about the nodes, including internal and external IP addresses, OS image, and container runtime version. This command also reveals if the node is acting as a master. | |
kubectl describe node <node_name> | Shows detailed information about a specific node, including its configuration, status, allocated resources (CPU, memory), running pods, and events. This is useful for troubleshooting. | |
| Pods | kubectl run <pod_name> --image=<image_name> | Imperatively creates and runs a new pod with a specified image. |
kubectl create -f <yaml_file> | Declaratively creates Kubernetes resources (like pods, deployments, services) from a YAML manifest file. | |
kubectl apply -f <yaml_file> | Declaratively applies changes to Kubernetes resources defined in a YAML file. If the resource doesn’t exist, it creates it. If it exists, it updates it. | |
kubectl get pods | Lists all pods in the current namespace, showing their name, ready status, current state, restart count, and age. | |
kubectl get pods -o wide | Provides more details for pods, including their internal IP address and the node they are running on. | |
kubectl describe pod <pod_name> | Displays comprehensive information about a specific pod, including its labels, annotations, status, container details, volumes, and recent events, which is crucial for troubleshooting. | |
kubectl exec -it <pod_name> <program> | Opens an interactive shell session inside a single-container pod to run commands directly within it. | |
kubectl exec -it <pod_name> -c <container_name> <program> | Opens an interactive shell session inside a specific container within a multi-container pod. | |
kubectl logs <pod_name> | Retrieves the logs for a specific pod. | |
kubectl logs <pod_name> -c <container_name> | Retrieves logs for a specific container within a multi-container pod. | |
kubectl delete pod <pod_name> | Deletes a specified pod. | |
kubectl delete -f <yaml_file> | Deletes Kubernetes resources (including pods) that are defined in the specified YAML file. | |
kubectl delete pod <pod_name> --force --grace-period=0 | Forcibly deletes a pod immediately, bypassing the graceful termination period. | |
kubectl get pod <pod_name> -o yaml > <output_file.yaml> | Extracts the current YAML definition of a running pod and saves it to a file, useful for recreating lost definitions or debugging. |
Basic commands
- kubectl run testcubeimage –image=hello-world –port=80
- kubectl delete pod testcubeimage
- kubectl describe pods